|
|
|||||||||||
 |
|
Database preparation steps
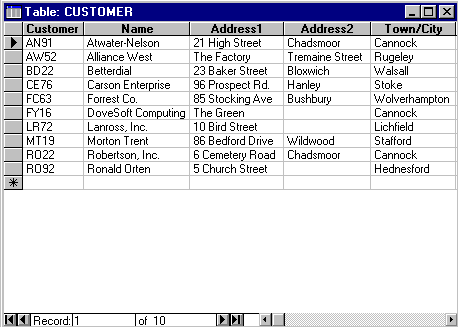
1. Introduction.The term database describes a collection of data organised in a manner that allows access, retrieval and use of that data. A database management system (DBMS), like Microsoft Access,allows you use a computer to create a database; add, change and delete data in the database; sort data in the database; retrieve data in the database; and create forms, graphs and reports using data in the database. In Access, a database consists of a collection of tables. Figure 1 shows a sample database for an organisation. It consists of two tables. The CUSTOMER table contains information about the customers of the organisation. The Sales Rep (SLSREP) table contains information about the organisationís sales representatives. The rows in the tables are called records. A record contains information about a given person, product or event. A row in the CUSTOMER table, for example, contains information about a specific customer. Customer Table:
Sales Rep (SLSREP) Table:
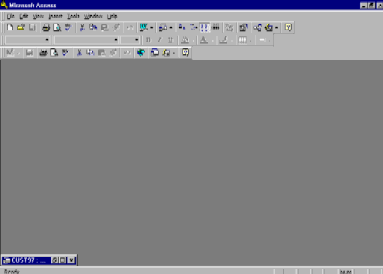
Figure 1. The columns in the tables are called fields. A field contains a specific piece of information within a record. In the CUSTOMER table, for example, the fifth field, Town/City, contains the town or city where the customer is located. The first field in the CUSTOMER table is the Customer Number. This is a code assigned by the organisation to each customer. Like many organisations, this organisation calls it a "number" even though it actually contains letters. The customer numbers have a special format. They consist of two uppercase letters, followed by a two-digit number. These numbers are unique, that is, no two customers will be assigned the same number. Such a field can be used as a unique identifier. This simply means that a given customer number will appear in only a single record in the table. There is only one record, for example, in which the customer number is CL67. A unique identifier is also called a primary key. Thus, the Customer Number field is the primary key for the CUSTOMER table. The next seven fields in the CUSTOMER table include the Name, Address1, Address2, Town/City, County, Post Code, Balance, and Credit Limit. For example, customer AN91 is Atwater-Nelson. It is located at 21 High Street, Chadsmoor, Cannock, Staffs. The post code is WS11 4JL. The current balance (the amount it owes to the organisation) is £3,478.50. Its credit limit (the amount its balance should not exceed) is £7,000.00. Each customer has a single sales representative. The last field in the CUSTOMER table, Sales Rep Number, gives the number of the customer's sales representative. The first field in the Sales Rep table, Sales Rep Number, is the number assigned by the organisation to each sales representative. These numbers are unique, so the Sales Rep Number is the primary key of the Sales Rep table. The other fields in the Sales Rep table are Last Name, First Name, Address1, Address2, Town/City, County, Post Code, Sales, and Commission Rate. For example, sales representative 04 is Cecilia Wright. She lives at 12 West Road, Quinton, Birmingham, West Midlands. Her Post Code is BR3 4GK. So far this year, she has sold £53,172.00 worth of product and her commission rate is 8% (0.08). The Sales Rep Number appears in both the CUSTOMER table and the Sales Rep table. It is used to relate customers and sales representatives. For example, in the CUSTOMER table, the sales representative number for customer AN91 is 04. To find the name of this sales representative, look for the row in the Sales Rep table that contains 04 in the Sales Rep Number field. Once you have found it, you will see that the name of the sales representative is Cecilia Wright. To find all the customers for whom Cecilia Wright is the sales representative, look through the CUSTOMER table for all the customers with 04 in the Sales Rep Number field. Her customers, as shown in figure 1, are AN91 (Atwater-Nelson), FC63 (Forrest Co.), and MT19 (Morton Trent). 2. What Is Microsoft Access?Microsoft Access is a powerful database management system (DBMS) that functions in the Windows environment and allows you to create and process data in a database. To illustrate the use of Microsoft Access, this course presents a series of projects. The projects use the database of customers and sales representatives. In the first project, the two tables that comprise the database are created and in the second project the appropriate records are added to them. The second project also uses a form to display the data in the tables, as well as a graph to visually represent the data, and prints a report of data contained in the tables. 3. Database Preparation StepsThe database preparation steps give you an overview of how the database, consisting of the CUSTOMER table and the SALES REP table shown in figure 1 will be built in this project as follows: 1. Start Microsoft Access. 2. Create the CUST database. 3. Begin the creation of the CUSTOMER table. 4. Define the fields in the CUSTOMER table. 5. Save the CUSTOMER table in the CUST database. 6. Add data records to the CUSTOMER table. 7. Print the contents of the CUSTOMER table. 8. Create and use a form to view the data in the CUSTOMER table. 9. Begin the creation of the Sales Rep table. 10. Define the fields in the Sales Rep table. 11. Save the Sales Rep table in the CUST database. 12. Add records to the Sales Rep table. 13. Create a graph that visually represents data from the Sales Rep table. Do NOT perform these operations yet as the following pages contain a detailed explanation of each of these steps. 4. Starting AccessPlace a formatted diskette in drive A. To start Access, click on the Microsoft Access icon in the Program Manager and the Access desktop should be displayed. This may take several seconds as Access is a large program and requires more time to load than smaller applications such as the Calculator or WordPad. 5. The DesktopThe first bar on the desktop is the title bar. It displays the title of the product, Microsoft
Figure 2. Access. The control menu box at the left end of the title bar is used to access the control menu. The second bar is the menu bar. It contains a list of menus. You select an option from the menu using the mouse or keyboard. The third bar is the toolbar. The toolbar contains buttons that allow you to perform certain tasks more quickly than using the menu bar. Each button contains a picture depicting its function. The specific buttons on the toolbar will vary, depending on the task on which you are working.
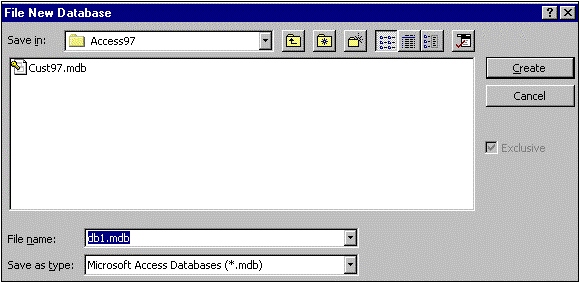
Normally the correct toolbar will display on each screen. If, for some reason, it does not, choose the tool bars command from the File or View menu and select the correct toolbar. The bottom bar on screen is the status bar. It contains special information appropriate for the task on which you are working. Currently it contains the single word Ready which means Access is ready to accept commands. 6. Creating a new databaseBefore creating tables that comprise the database, you need to create the database itself as a file on disk. Once the database is created, all tables, reports, and forms will automatically be placed within it. The following steps create a new database called CUST. Select the File menu by pointing to the word File on the menu bar and clicking the left mouse button. Then point to the New Database command. Choose the New Database command from the File menu by clicking the left mouse button. A dialog box is offered containing General and Database tabs. Click the General tab, select the Blank Database icon and click OK. Type CUST name as the filename and then point to the drop-down list arrow next to the Drives list box. Click the drop-down list arrow and then point to a: Select drive A by clicking the left mouse button and then point to the OK button. The filename is entered and the drive is selected. The database is created on disk. The database: CUST window should display as shown in figure 3.
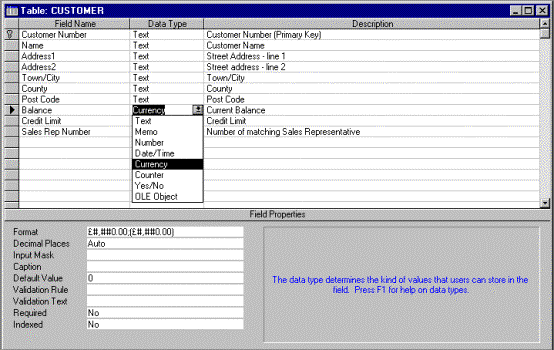
Figure 3. It is interesting to check how large the file is before any records are added. 7. Creating a table.An Access database consists of a collection of tables. Once you have created the database, you must create each of the tables within it. In this project, for example, you must create both the CUSTOMER and SALES REP tables shown in figure 1. To create a table, you describe the structure of the table to Access by describing the fields within it. For each field, you indicate the following information: ® Field name - Each field in the table must have a unique name. In the CUSTOMER table (Figure 4), for example, the field names are Customer Number, Name, Address 1, Address 2, Town/City, County, Post Code, Balance, Credit Limit, and Sales Rep Number. ® Data type - Data type indicates to Access the type of data that the field will contain. Some fields, such as Commission Rate, can contain only numbers. Others, such as Balance and Credit Limit, can contain numbers and pound signs. Still others, such as Name and Address, can contain letters. ® Description - Access allows you to enter a detailed description of the field. You can also assign field widths to text fields (fields whose data type is "Text"). This indicates the maximum number of characters that can be stored in the field. If you do not assign a width to such a field, Access assumes the width is 50. You must also indicate which field or fields make up the primary key, that is, the unique identifier, for the table. In the sample database, the Sales Rep Number is the primary key of the SALES REP table and the Customer Number is the primary key of the CUSTOMER table.
Figure 4. To name a field, follow these rules: ® Names can be up to 64 characters in length. ® Names can contain letters, digits, spaces, as well as most of the punctuation symbols. ® Names cannot contain periods (.), exclamation points (!), or square brackets ([ ]). ® The same name cannot be used for two different fields in the same table. Each field has a data type. This indicates the type of data that can be stored in the field. The data types you will use in this project are: Text - The field can contain any characters. Number - The field can contain only numbers. The numbers can be either positive or negative. Fields are assigned this type so they can be used in arithmetic operations. Fields that contain numbers but will not be used for arithmetic operations are usually assigned a data type of Text. The Sales Rep Number field, for example, is a text field because the sales representative numbers will not be involved in any arithmetic. Currency - The field can contain only pound amounts. The values will be displayed with pound signs, commas, and decimal points, with two digits following the decimal point. Like numeric fields, you can use currency fields in arithmetic operations. Access automatically assigns a size to currency fields. The field names, data types, field widths, primary key information, and descriptions for the CUSTOMER table are shown in Figure 4. With this information, you are ready to begin creating the table. To create the table, use these steps: 7.1 Point to the New button in the Database dialog box. 7.2 Choose the new button by clicking the left mouse button and then point to the New Table button. The New Table dialog box should now display. If you have not already determined the fields that comprise your table, you can use Table Wizards. These guide you through the table creation by suggesting some commonly used tables and fields. If you already know the fields you need, however, Table Wizards are NOT particularly helpful. 7.3 Choose the New Table button and the Table Dialog box should be displayed. To create the table you make entries in the Field Name, Data Type, and Description columns. You enter additional information in the Field Properties box located near the bottom of the Table Dialog box. The current field indicator (u) should be currently positioned on the first field, indicating that Access is ready for you to enter the name of the first field in the Field Name column. The next step in creating the table is to define the fields by specifying the required details in the Table Dialog box. Perform the following steps to accomplish this task, using figure 5 as a guideline. 7.4 Type CUSTOMER NUMBER (the name of the first field) in the Field Name column and press the TAB key. The words Customer Number display in the Field Name column and the highlight advances to the Data Type column, indicating you can enter the data type. The word Text, one of the possible data types, currently displays. You can also use a drop-down list arrow to display a list of available data types. 7.5 Since Text is the correct data type, press the TAB key to move the highlight to the Description column, type CUSTOMER NUMBER (PRIMARY KEY) as the description and then point to the Set Primary Key button i.e. that containing the key icon, on the toolbar. At this stage, the Set Primary Key button should be the fifth button from the left on the toolbar. 7.6 Click the Set Primary Key button to make the Customer Number the primary key and then point to the Field Size text box. Customer Number is the primary key as indicated by the key symbol that appears in front of the field. The pointer, which has changed shape to an I-beam, is in the Field Size text box. 7.7 Select the Field Size text box by clicking the left mouse button. Press the BACKSPACE key twice to erase the current entry of 50. Type 4, which is the size of the Customer Number field. Point to the Field name column just below the field name Customer Number in the second row. The Field Size is changed to 4.
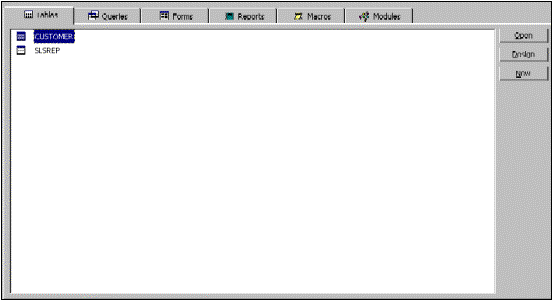
Figure 5. 7.8 Click the left mouse button to select the second row, that is, to prepare to enter the second field. The current field indicator should move to the second row just below the field name Customer Number 7.9. Use the techniques illustrated in paragraphs 7.4 to 7.8 to make the entries from the CUSTOMER table structure shown in figure 4. You will NOT need to click the Set Primary Key button for any of these fields. The additional fields are entered. A drop-down list of available data types displays in the Data Type column and use figure 4 to select the correct type. Notice that in figure 5, a custom format has been selected for the currency data types. If you press F1 when positioned on the Format field, Access will display context sensitive help on using formats. 8. Correcting Errors in the Table Structure.When creating a table, check the entries carefully to ensure they are correct. If you make a mistake and discover it before you press the TAB key, you can correct the error by pressing the BACKSPACE key until the incorrect characters are removed. Then, type the correct characters. If you don't discover a mistake until later, you can correct it by pointing to the entry with the mouse, clicking the left mouse button, and typing the correct value, and then pressing the ENTER key. If you accidentally add an extra field to the structure, select the field by pointing to the leftmost column on the row that contains the field to be deleted and then click the left mouse button. Once you have selected the field, press the DELETE key. This will remove the field from the structure. If you forget a field, select the field that will follow the field you wish to add, select Edit, and then choose the Insert Row command. The remaining fields move down one row, making room for the missing field. Make the entries for the new field in the usual manner. If you made the wrong field a key field, point to the Key entry for the field, click the left mouse button, and then click the Set Primary Key button. As an alternative to these steps, you might want to start again. To do so, choose the Cancel button in the Create Access Table dialog box and then choose No. The original desktop displays and you can repeat the process you used earlier. 9. Saving a Table.The CUSTOMER table structure is now complete. The final step is to save the table within the database. To do so, you must give the table a name. Table names are from one to sixty-four characters in length and can contain letters, numbers, and spaces. The two table names in this project are CUSTOMER and SLSREP. To save the table, perform the following steps:- 9.1. Select the File menu and point to the Save command. 9.2. Choose the Save command by clicking the left mouse button and the Save As dialog box should display. Type CUSTOMER (in uppercase letters) as the name of the table and point to the OK button. 9.3. Point to the Close button in the Table: CUSTOMER window. Click the Close button to close the window and conserve memory. 10. Adding Records to the Customer Table.Creating a table by building the structure and saving the table is the first step in a two-step process. The second step is to add records to the table. In order to add records to a table, the table must first be open. To open a table, select the table in the Database window (see figure 6) and choose the Open button.
Figure 6 - Database window. 10.1. Point to the Open button in the Database window and click the left mouse button. Next click the maximise button in the Table: CUSTOMER window. The window contains the Datasheet view for the CUSTOMER table and the current record indicator is positioned on the first record. The status bar at the bottom of the window also indicates that the record is positioned on record 1. The table should display in datasheet view, and the table is represented as a collection of rows and columns as shown in figure 7.
Figure 7. You often add records in phases. You may, for example, not have enough time to add all the records in one session. To illustrate this process, we will begin by adding the first two records from figure 1. Referring to figure 7, notice that all records have already been inserted. 10.2 Ensure that the cursor is positioned in the Customer Number of the first record and type AN91. The AN part of the value must be in uppercase. 10.3. Press the TAB key to complete the entry for the Customer Number field. Type Atwater-Nelson and press the TAB key. Type the Address 1 entry - 21 High Street, and press TAB. Type the Address 2 - Chadsmoor and press TAB. Type the Town/city - Cannock and press TAB and enter the County - Staffs, press TAB again and enter the Post Code of WS11 4JL. The name, address, town/city and county fields are entered. The data for the postcode displays on the screen but is NOT complete until you press the TAB key. 10.4. When TAB is pressed, the highlight advances to the Balance field. Type the balance 3478.50 and press the TAB key. Type the credit limit 7000 and press the TAB key and type 04 (sales rep number). Ensure that you type 04 rather than simply 4. Access automatically adds pound signs and commas to the data in the Balance and Credit Limit fields, because they are currency fields. The sales rep number has been typed, but is still positioned on the field until you press TAB. 10.5 At this point, the fields are shifted back to the right, the record is saved, and the insertion point moves to the customer number on the next row. Now add the second record from figure 1. 11. Closing a Table and a Database.It is a good idea to close a table as soon as you have finished working with it. It keeps the screen from getting cluttered, prevents you from making accidental changes to the data in the table, and releases computer memory. In addition, if you are no longer working with the database, it is a good idea to close the database as well. The following steps describe these processes: 11.1 Point to the Close button for the Table window. 11.2 Click the close button to close the table and then point to the Close button for the Database window. Click the Close button to close the Database window and the database should be closed and the database window removed from the screen. 12. Opening a Database.In order to work with any of the tables, reports or forms in a database, the database must be open. This is achieved by using the Open Database command on the File menu. If the database is already open, the Database window will already be displayed on the screen. 12.1. Select the File menu and click the Open Database command. 12.2. If the drive listed in the Drives text box is not A, change it to A by clicking the drop-down list and selecting A. Select the CUST database by pointing to it and clicking the left mouse button. Then click the OK button in the Open Database dialog box and the database should open and the Database window be displayed. Adding Additional Records.12.3. You can add records to a table that already contains data using a process almost identical to that used to add records to an empty table. The only difference is that you place the highlight AFTER the last data record before you enter the additional data. To do so, use the navigation buttons found near the lower left-hand corner of the screen. These are described in figure 8.
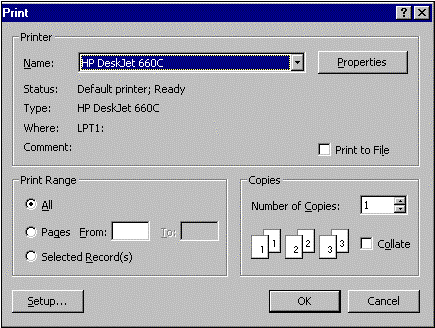
Figure 8. Click the Last Record navigation button and Access positions the highlight on the last record in the table. Next, click the Next Record navigation button and add the eight remaining records into the CUSTOMER table using the same techniques you used to add the first two records. Subsequently, close the table by clicking the Close button. Access maintains the data so the primary key always orders it. As Customer Number is the primary key of the CUSTOMER table, the data in the table will automatically be arranged so the customer numbers are in alphabetical order. The data that you just entered happened to be in the correct order. If you enter a record containing a customer number that is not in alphabetical order, however, Access will automatically place it in order. You will not notice this immediately, but rather the next time you open the table. For example, if you add a record with customer number PR29, it will appear at the end of the table. The next time you open the table, however, it will appear between the record for customer MTl9 and the one for customer RO22. Records are ordered in ascending order by the primary key field. 13. Correcting Errors in the DataJust as when you created the table, check the entries carefully to ensure they are correct. If you make a mistake and discover it before you press the TAB key, correct it by pressing the BACKSPACE key until the incorrect characters are removed and then typing the correct characters. If you discover an incorrect entry later, correct the error by pointing to the entry with the mouse, clicking the left mouse button, and then making the appropriate correction. If the record you must correct is not on the screen, use the navigation buttons (Next Record, Previous Record, and so on) to move to it. If the field you want to correct is not visible on the screen, use the horizontal scroll bar along the bottom of the screen to shift all the fields until the one you want displays. Then, make the correction. If you accidentally add an extra record, select the record by pointing to the box that immediately precedes the record and clicking the left mouse button. Then, press the DELETE key. This will remove the record from the table. If you forget a record, add it using the same procedure as for all the other records. Access will automatically place it in the correct location in the table. Occasionally, you might attempt to add a record, but Access refuses to accept it. Instead, it gives you an error message, indicating the problem. The most likely reason for this in the CUSTOMER table is inadvertently entering a customer number that duplicates the customer number on another record. Suppose, for example, that when you typed the fifth record (Forrest Co.), you accidentally entered the customer number for the sixth record (FY16). When you later tried to add the sixth record, Access rejected the addition, because a record with the same customer number (FY16) was already in the table. If this occurs, first check the customer numbers carefully, make any necessary corrections, and then try again to add the record. If you cannot determine how to correct the data, you have a problem. Access will not allow you to move to any other record until you have made the correction, nor will it allow you to close the table. You are, in effect, stuck on the record. If you should ever find yourself in this situation, simply press the ESC key. This will remove the record you are trying to add from the screen. You can then move to any other record, close the table, or take any other action you desire. 14. Previewing and Printing the Contents of a Table.When working with a database, you will often need to obtain a printed copy of the table contents. Because the CUSTOMER table is substantially wider than the screen, it will also be wider than the normal printed page on portrait orientation. Portrait orientation means the printout is across the width of the page. Landscape orientation means the printout is across the length of the page. Thus, to print the wide database table, use landscape orientation. If you are printing the contents of a table that fits on the screen, you will not need landscape orientation. A convenient way to change to landscape orientation is to use Print Preview. This allows you to determine whether landscape orientation is necessary and, if it is, to easily change the orientation to landscape. 14.1 Ensure the CUSTOMER table is selected. (Because it is currently the only table in the database, it will automatically be selected, so you donít need to take any special action at this stage). Click the Print Preview button i.e. the button to the right of that containing the printer icon and a preview of the report should be displayed in portrait mode. In portrait orientation all fields on a page may not be displayed. To change to landscape mode, choose Properties from the File>Print SetUp menu. Refer to figure 9 and click the Properties button, and in the next screen click the Orientation>Landscape option.
Figure 9. After changing the orientation, click the OK button and print the table by either selecting Print from the File menu or by clicking on the Print icon, which is third from left on the toolbar. The report in figure 10 should be printed.
Figure 10. The values in figure 10 are only supplied for illustrative purposes and are not readable! 15. Creating Additional Tables.A database typically consists of more than one table. The sample database contains two: the CUSTOMER table and the SLSREP table. You need to repeat the process of creating a table and adding records for each table in the database. In the sample database, you need to create and add records to the SLSREP table. The structure for the table is given in figure 11 and the data is in figure 1. As an exercise constructthe SLSREP table and enter the three sales rep records into the table. Save and close the table on successful completion.
Figure 11. 16. Using a Form to View Data.In creating tables, you have used Datasheet view, i.e. the data on the screen displayed as a table similar to a spreadsheet. You can also use Form view, in which you see a form displaying a single record at a time. The advantage with Datasheetview is that you can see multiple records at once. It has the disadvantage that, unless you have few fields in the table, you cannot see all the fields at the same time. With Form view, you see only a single record, but you can see all the fields in the record. The view you choose is a matter of personal preference. The simplest way to create a form is to use the AutoForm button. To do so, first highlight the table for which the form is to be created in the Database window and click the arrow next to the New Object button on the toolbar, and then click the AutoForm button in the dropdown listbox:
Ensure the CUST database is open, the Database window displays and the CUSTOMER table is highlighted. Click the AutoForm button as identified above and the form should display. You can use Form view like you used Datasheet view. Use the navigation buttons to move between records. You can add new records or change existing ones. Press the DELETE key to delete the record displayed on the screen. In other words, you can perform database operations using either Form view or Datasheet view. As you only see one record at a time in Form view, to see a different record, such as the fifth record, use the navigation buttons to move to it.
Figure 12. Closing the form is similar to closing a table. The only difference is that you will be asked if you want to save the form. Click the Close button for the Customer window and then click the Yes button on the displayed Access dialog box asking if you want to save the form. Type CUSTOMER as the name of the form and click the OK button. The form is saved as part of the database and is removed from the screen. Using the Saved Form (Customer Form)Once you have saved the form, you can use it at any time in the future by opening it. Opening a form is similar to opening a table. Ensure that the CUST database is open, the Database window is on the screen and point to the Form tab. Choose the required form from the list of forms displayed on the screen and the form should display. It can now be used in the manner described earlier and once you have finished working with the form, close it. You will not be asked if you want to save it as it has already been saved. The form is removed from the screen and the Database window displayed. 17. Creating a Graph.Sometimes the most effective way to present data in a database is graphically. Access contains a graphics tool that allows you to create and customize a wide variety of graphs. A Graph Wizard can assist in the creation of a graph. These notes create the graph shown in Figure 13. It illustrates the sales figures of each of the three sales representatives. The sales representative numbers appear along the x- (horizontal) axis. The sales amounts are represented along the y-(vertical) axis. The height of each bar represents the sales amount for the corresponding sales representative.
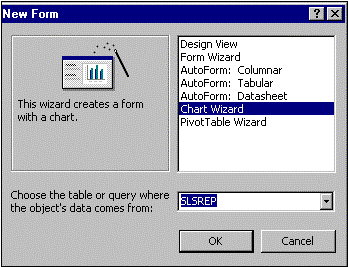
Figure 13. In creating a graph, you must select the field for the x-axis first. You can then select the field or fields for the y-axis. To create the graph shown in Figure 13, for example, you must select the Sales Rep Number field first and then select the Sales field. The Graph Wizard then gives you a chance to make a number of selections that affect the appearance of the final graph. In each case, the Graph Wizard makes an initial selection for you and then gives you the option of changing the selection. For the graph shown in Figure 13, you can simply accept the selections the Graph Wizard makes for you. The following steps are performed to produce this graph: 17.1 Ensure the CUST database is open and the Database window is on the screen. Choose the Form tab and then click the New button. 17.2 A New Form dialog box should be displayed. Click the Chart Wizard and the down arrow in the Choose the table or query where the objectís data comes from: list box. 17.3 Select the SLSREP table from the offered list of tables and queries by clicking on it with the left mouse button. (See figure 14).
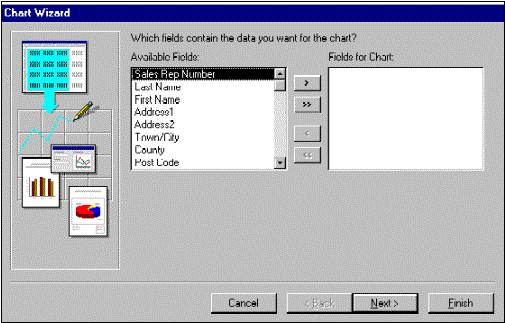
Figure 14. 17.4 Click the OK button and then select the Sales Rep Number and click the Add Field button. Perform a similar task by clicking and adding the Sales field (see figure 15).
Figure 15. 17.5 Click the Next button and a dialog box should appear requesting the type of graph required. Choose column chart for this example. 17.6 After again clicking Next, a dialog box is displayed asking for the title of the Graph. Enter Sales by Sales Representative. 17.7 Choose the Next button and then click the Finish button. The chart in figure 13 should be displayed. Because a graph is just a special type of form, closing and saving a form is the same process as closing and saving a graph i.e. Click Close on the graph form window and a dialog box will ask you if you wish to save the graph. Choose the Yes button and type SALES BY SALES REPRESENTATIVE as the name of graph and click the OK button. In addition to viewing the graph on the screen, you can also print the graph. Select the Sales by Sales Representative form from the Database window and click on Open. The graph should be displayed on screen, at which stage, click the Print Preview button. If the preview is OK, click the Print button to obtain a printed copy. 18. Using On-line HelpWith Access, you can obtain help at any time by using the Help menu. For most information, choose Contents, which provides a variety of ways of finding the information that you need. You can also choose Search to search for a specific topic or procedure. The Cue Cards command displays a series of screens that walk you through a variety of tasks in the form of a tutorial. About Microsoft Access gives information about the version of Access and the user to whom the product is registered. Click the Office Assistant button and then click any other button to obtain help on the other button.
|
||||||||||||||||||||||||||||||||||||||||||||||||||||||||||||||||||||||||||||||||||||||||||||||||||||||||||||||||||||||||||||||||||||||||||||||||||||||||||||||||||||||||||||||||||||||||||||||||||||||||||||||||||||||||||||||||||||||||||||||||||||||||||||||||||||||||||||||||||||||||||||||||||||||||||||||||||||||||
|
[Home] [Database Creation] [Queries] [Maintenance] [Reports] [Normalisation] [Switchboards] [Macros] |
