|
You may have used macros in Microsoft Excel or Microsoft Word. At their simplest they simply record actions performed from the keyboard which can be played back to automate a process. The macro generates program code in a language called Visual Basic for Applications(VBA). In Access, however, macros cannot be recorded but must be created manually. Alternatively, you can use the Modules facility of Access to create macros using VBA.This offers a far more powerful solution than using macros but is outside the scope of this course. This module explains what Access macros are, and how to create and update them. Topics include:
Creating a macro to maximise a form when opened
Macro groups
Running macros using command buttons
Creating a menu with command buttons
1. Introduction.
A macro is a small program that tells Access to perform one or more actions such as running a query, opening a form or printing a report. Once you have written the macro you can save it and run it from the Database window, or you can attach it to an Event Property of a form, report or Command button.
2. Create a macro to maximise a form and attach it to the forms On Open Event Property.
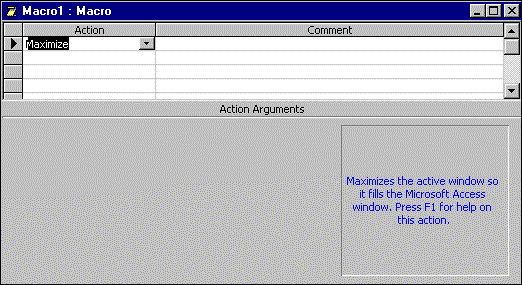
Open the Cust database. In the Database window select the Macros tab and click New. You will see the Macro window. To add an action, you click the drop-down arrow on the first line under Action and select an action. For a complete list of possible actions refer to the Access Help system. Scroll down the Action list and select Maximize. You can put anything you like in the Comment column; it has no effect on the running of the macro, and is used to remind the developer what a particular macro is for.
Figure 1.
We want this macro to run whenever the Customer form is opened. We can do this by attaching the macro to the form's Open Event property.
From the Database window, open form Customer in Design view. At the intersection of the ruler lines in the top left comer of the form there is a little black square. Right-click this square and select Properties to open the Properties sheet for the form. Click the Event tab at the top of the Properties sheet and click the On Open property as outlined in figure 2.
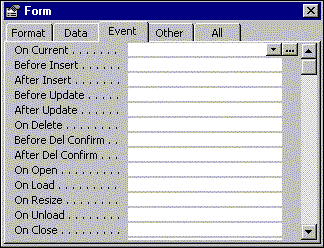
Figure 2.
- Click the down arrow to see a list of macros or modules that we could attach to this event. There is only one mcrMaximise, the macro that we have just created. Click this to select it.
- Switch to Form view - the macro should run as soon as the form opens, and the window is maximised.
- Save the form and close it.
3. Create and run macros that are part of a group.
In this task you will create two macros that will later be attached to command buttons on a menu contained in a form.
3.1. Creating a macro group
Macros are often very short and instead of storing each macro in a separate macro window, it makes sense to store related macros in a group under one name in the Database window. We will store two macros under one group name which a user will select from in order to:
- Add a new customer
- Edit/Delete a customer.
In the Database window select the Macros tab and click New. Click the Macro Names icon on the toolbar to add another column to the Macro window. You can identify the Macro Names icon by referring to the tooltip as your mouse hovers over the relevant icon. In the first line of the new column type the macro name mcrAddCustomer. In the Action column select the action OpenForm. This action requires action arguments; you have to specify which form is to be opened, in what view (Form, Design, Print Preview or Datasheet), and other optional action arguments as shown below in figure 3. Select Customer as the Form Name and leave the other arguments with their default values.
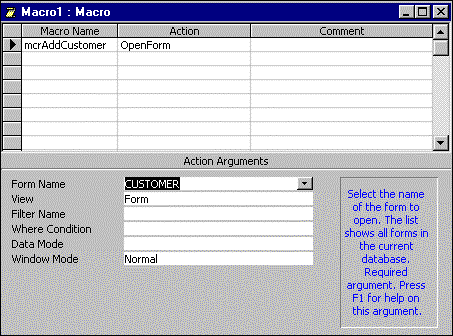
Figure 3.
We want the form to open ready for the User to enter a new record. In the second line of the Action column, select the action GoToRecord, and in the Record Action Argument in the lower half of the window select New. Click the Save tool on the toolbar to save the macro as mmnuCustomer. This will be the name of the macro group in which the first macro is mcrAddCustomer.

Figure 4.
Run the macro and test it. Now enter the second macro. On the third line in the macro name column enter the name mcrEditCustomer. The first action is once again to open the form Customer. If you type o in the action column, Access should guess correctly that you want OpenForm. Enter the name of the form in the lower half of the window, under Form Name, and ensure that Form is entered under View. The next action in line 4, is to position the cursor in the Name field. Type g in the Action column and Access should correctly guess GoToControl. Type Name as the Action argument as we want to go to the Name field in the Customer form. Save the macro.
When this macro is run, the form should open at the first record with the cursor in the Customer Name field. The User can then press the Find button on the Toolbar or use a customised Command Button, which we place on our form as described later in this session.
3.2. Running a macro that is part of a group.
You cant run this macro simply by pressing the Run button, as this will only run the first macro in the group.
From the Tools menu select Macro, Run Macro. In the dialog box click the down arrow and select mnuCustomer.mcrEditCustomer as outlined in figure 5.
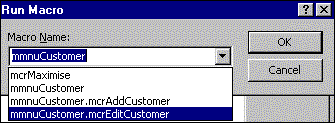
Figure 5.
Click OK. The Customer form should open with the cursor in the Customer Name field of the first record. In the next task well add a Find button, which the User can click to open the Find dialog box. Close the form and the macro to return to the Database window.
4. Adding Command Buttons to run macros.
Command buttons may be placed on forms or reports for the user to click in order to perform some predefined task for example, you could place a Print command button on a form or report for a user to click instead of using a button on the Access toolbar.
Placing command buttons is one way to customise an application for a user who may not be familiar with the built-in Access tools and menus. You can associate one or more actions with a command button, in either of the following ways:
Use the Command Button Wizard to select an action for a button; Create a button without the Wizard and then use the button's Properties Sheet to select a macro or code to run when the button is clicked.
We'll be using the Command Button Wizard in the next task.
In this task you'll add a command button to form Customer which when pressed will open the Find dialog box to enable the user to search for a particular customer' s record.
In the Database window select the Forms tab and select Customer. Click Design. We'll place the button in the Form Footer. Place the cursor over the lower edge of the Form Footer and when it changes to a double-headed arrow drag downwards to create space in the Form Footer. Enlarge the window if necessary so that you can see the whole form. The toolbox should be visible if it is not, select View, TooIbox from the menu. Click the Command Button tool on the toolbox and drag out a reasonable sized button in the Form Footer. The button is automatically given a caption such as Command24 because it is the 24th control to be placed on the form. This will be changed later. The Command Button Wizard starts up automatically and you will see the following screen:
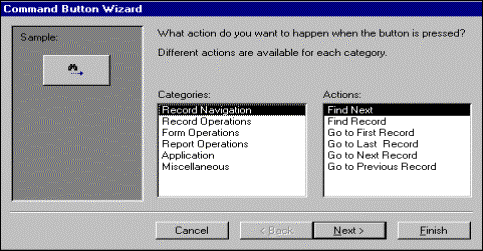
Figure 6.
If the screen in figure 6 does not appear, you probably dont have the Control Wizards tool selected on the Toolbox. If that is the case, delete your button, select the Control Wizards tool, and then place another Command Button on the form.
Have a look through the Categories list box on the left hand side. The right hand list box tells you what actions are available in each category. When you have finished browsing, select Record Navigation in the Categories list box and Find Record in the Actions list box, and click Next. In the next dialog box in figure 7, you are asked to choose the picture or text that will appear on your button. If you click Show All Pictures you will be able to select from a much larger list. Bear in mind that the User will have to guess what the button does if you choose some obscure graphic like a coffee cup.
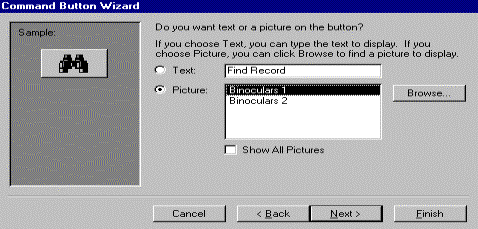
Figure 7.
When you have selected a suitable graphic, or selected Text, click Next. You are asked to type a meaningful name for your button something better than Command24. The Name is not the same as the Caption, but it appears in the Properties sheet when you select the button and it is sensible to give it an identifiable name. Using figure 8 as a guide, type FindRecord and then click Finish.
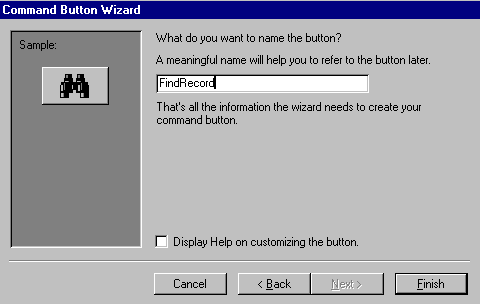
Figure 8.
· Switch to Form View and try out your button. The Find dialog box should open, but if the cursor is in Customer Number field, you will be searching for a particular Customer Number, which is probably not useful. Close the box, tab to the surname field and search for, say, Betterdial. You can use wildcards in a search, so that, for example, if you enter b*, then Access will find the first customer whose Name begins with b.
· Save and close your form.
That is the end of this task. The next task will combine command buttons and macros on a menu form.
4.1. Create a menu with command buttons.
In this task you'll create a menu with two options: Add a customer, and Edit/Delete a Customer.
In the Database window select the Forms tab and click New. In the New Form dialog box choose Design View and leave the list box at the bottom window blank, since this form will not be bound to a table or query. Click OK. A new blank form opens in Design view. Enlarge the window slightly and drag the comer of the form so that it fills the window. Click the Label tool and drag out a box at the top of the form. Type Customer Menu in the box. Click the Select Objects tool to select the box and change the font and type size to something suitable. Now click the Command Button tool on the toolbox and place it on the form (see Figure 9 below). In the Command Button Wizard dialog box click Cancel, as we will assign one of our own macros to this button. Use the Label tool to type a label Add a new customer next to the button, and adjust the font and type size. You can copy your button and label to create the second menu option. Click in the left hand ruler line opposite the button and its label this selects everything in line with where you click. Press Ctrl-C to copy the button and its label, and Ctrl-V to paste them. You may need to adjust the position of the second button. Edit the text on the second label so that it says Edit/Delete a customer, and delete the text on the buttons. Your menu should look something like the one below:
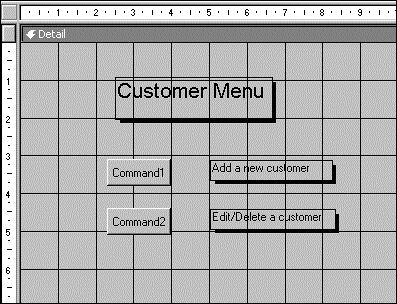
Figure 9.
4.2. Defining a buttons event property.
All we have to do now is to define what is to happen when a button is clicked. To do this we need to set each button's On Click Event property.
Right-click the first button and select Properties. (Or, if the properties sheet is already on screen, left-click the button.) Click each of the tabs at the top of the Properties sheet and browse through the options. You can change the colour, size, font etc using the various Format properties. Click the Event tab. Select the On Click event and you will see a drop-down list that includes all the macros we have already created. Select mmnuCustomer.mcrAddCustomer. Select the Edit/Delete a Customer button and set its On Click Event property to mmnuCustomer.mcrEditCustomer Click Form View on the toolbar to see what your menu looks like.
A menu form such as this should not have Record Selectors, Navigation Buttons, Min Max Buttons or Scroll Bars. These can be removed by setting the Form's Format properties appropriately.
4.3. Setting the properties of the form.
Return to Design view and click the square at the intersection of the ruler lines. This brings up the form's properties. Click the Format tab on the Property sheet, and set Scroll Bars to Neither, Record Selectors and Navigation Buttons to No, Min Max Buttons to None. Switch to Form view. Try out the buttons. Add a new customer should take you to a new customer form, and Edit/Delete a customer should take you to the first record, with the focus in the Surname field. Save the form as.mnuCustomer, and close it.
|