|
|
|||||||||||
 |
|
Creating a Switchboard from an Access add-in.
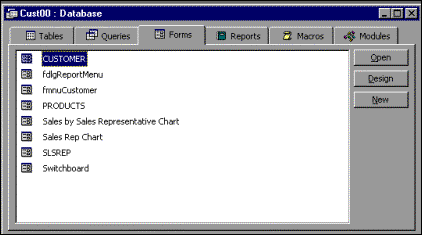
1.Introduction.When Microsoft Access is started, you are normally presented with the Database Window as outlined in figure 1:
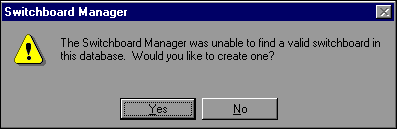
Figure 1. This screen is essential when developing a database, but on completion of the design it is often a good idea to design a Switchboard form containing easily selectable facilities offered by your database. Many users, especially if inexperienced, find the database window intimidating and a switchboard form allows the developer to black box facilities to allow easier user selection. A switchboard form is essentially a menu and normally allows users to select previously created forms, reports and queries. If your database is more sophisticated and includes many forms, reports etc., your main switchboard form can switch to other switchboards each of which may exclusively contain forms for adding or editing records, or for running reports or for processing queries. These notes show you how to create a switchboard form and to start it automatically when your database is loaded into Microsoft Access. 2. Using the Switchboard Add-In.When all your forms, reports and queries have been created, the switchboard form(s) can be created. A switchboard is created using a Microsoft Access Add-In. From the Access menu, select options Tools, Add-Ins, Switchboard Manager. If a switchboard does not exist in your database, you will be presented with the following dialog box:
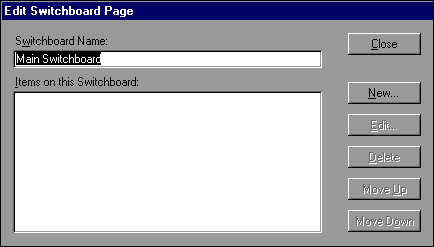
Figure 2. Click Yes and a new switchboard page will be created. Amend the switchboard name as displayed in figure 3, to contain appropriate text.
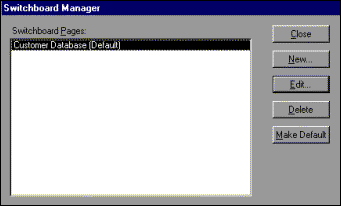
Figure 3. At this stage, Microsoft Access will automatically create a switchboard table and form. You can view both of these from the database window, Alternatively if the switchboard page already exists, you will be offered the screen displayed in figure 4, which contains all the switchboards contained in the open database.
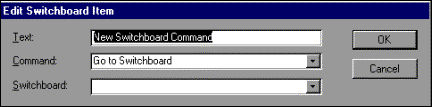
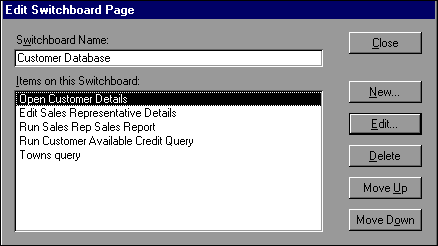
Figure 4. Select the relevant switchboard page, and click Edit. You will be presented with another dialog box allowing input of entries to be included as menu options on the switchboard page. Click the New option to add each menu option in turn. Each new menu option is added to the switchboard page using the Edit Switchboard Item dialog box (see figure 5):
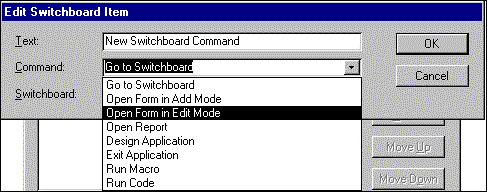
Figure 5. You need to enter three values in this dialog box for each entry that appears on your switchboard page. ¨ The Text entry contains the textual description appearing on the switchboard page. You can enter spaces between words, if required. Typically you might enter Add Customer Details or Run Customer Details Query. ¨ The Command entry requires selection from a pull-down list presented when you click the down arrow to the right of the entry (see figure 6).
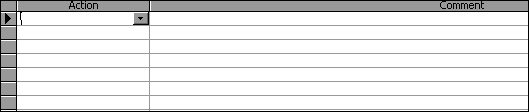
Figure 6. ¨ Most of the commands are self-explanatory but note that Open Form in Add Mode, opens an existing form with no data contained in any of the input fields; and Open Form in Edit Mode opens an existing form with data from the first record in the table or query displayed. Exit Application, terminates and closes the current database. Design Application and Run Code can be ignored at present. Note also that it is NOT possible to run a query direct from the list of commands. Instead you will need to create a macro as described in section 3 and choose command Run Macro. ¨ Depending on your selection in the Command entry, the Switchboard entry will list all available forms, reports or macros. Select the required value from the list appropriate to the description you entered in the Text entry. Repeat this process and create all Switchboard menu options as required. On completion, close the switchboard add-in and return to the database window. 3. Creating a macro to allow queries to be run from a switchboard.From the database window, click the Macros tab and New. In the presented dialog box as outlined in figure 7, click the down arrow to the right of the first row in the Action column.
Figure 7. Select the Open Query option. You will need to scroll down to find this option. Now refer to the Action Arguments at the bottom half of the screen (see figure 8). Click the down arrow to the right of the Query Name row and select the appropriate query from the drop down list. Close the macro and, when requested, assign an appropriate name for example macCustomers. Your macro can now be used to run a query from the switchboard page as described in section 2.
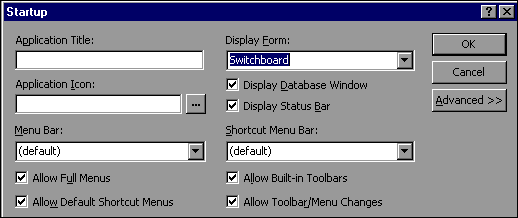
Figure 8. 4. Updating the design of the switchboard form.In the database window, select the Forms tab and the Switchboard form. Click Design and now you can amend label text or insert pictures/clipart to enhance your form. For example, to amend the titletext of the switchboard form, click the relevant label control. When the black handles appear around the label, right mouse click to select the context menu and select Properties. Click the Format tab, and in the caption property amend/update the required text. On completion close the property and on return to the switchboard form, the title text should be updated. Experiment by clicking the various controls on the switchboard. You can easily add an image to enhance the appearance of the form by selecting menu options Insert, Picture and in the offered dialog box navigate to the required folder and file. Double clicking on the required image file automatically inserts it into the switchboard form where you may need to resize and move the image. 5. Automatically displaying the Switchboard at start-up.When the switchboard form has been created, it can be automatically displayed when your database is opened. Click the Tools and Start-up menu options. A dialog box should be opened as displayed in figure 9:
Figure 9. In the Application Title:, enter a meaningful description of your database, such as Customer Details. In Display Form:, click the down arrow to the right and select Switchboard. At this stage, leave the other options containing their default values. Click OK and close the database. When the database is again opened, the switchboard form should be automatically displayed. Tip In the unlikely event of a serious error occurring in the creation of your switchboard, go to the database window and delete both the switchboard table and form. When you select the switchboard manager again, you will be informed that no switchboard exists and requested if you would like to create one. 6. Updating the Switchboard.The switchboard can be updated at any time by first starting the switchboard manager. Click on the relevant switchboard page and click Edit to amend or add to the switchboard entries.
Figure 10. In the Edit Switchboard Page dialog box (see figure 10), select either of the four following options: ¨ New Adds an additional switchboard entry. ¨ Edit Amend an existing switchboard entry. You can update the text, command or switchboard value. Note that switchboard is substituted by form report or macro depending on the original selection. ¨ Delete Removes a switchboard entry. ¨ Move Up or Move Down Re-arrange the order in which the switchboard entries are displayed.
|

|
[Home] [Database Creation] [Queries] [Maintenance] [Reports] [Normalisation] [Switchboards] [Macros] |